Spring Boot + MySQL Database example (CRUD) in Java
Java
Spring Boot + MySQL Database example (CRUD) in Java
Introducing Spring Boot and Spring Framework:
-
The Power of Spring Framework: The Spring framework is a popular Java framework known for its extensive features and capabilities in building enterprise-grade applications. It provides a robust set of tools and functionalities, including dependency injection, aspect-oriented programming, data access, and more. Spring Framework promotes modular and maintainable code, making it a top choice for developers.
-
Streamlined Development with Spring Boot: Spring Boot takes the Spring framework to the next level by significantly reducing the configuration and setup time required for Spring projects. With Spring Boot, you can start a project with minimal settings and quickly focus on developing the essential features specific to your application. It simplifies the development process and allows for rapid prototyping and deployment.
Introducing the Purpose of the Blog:
In this Spring Boot tutorial, we will guide you through the development of RESTful web service APIs for performing CRUD (Create, Retrieve, Update, Delete) operations on a MySQL database. This comprehensive tutorial will equip you with the necessary knowledge and practical skills to build robust APIs using Spring Boot.
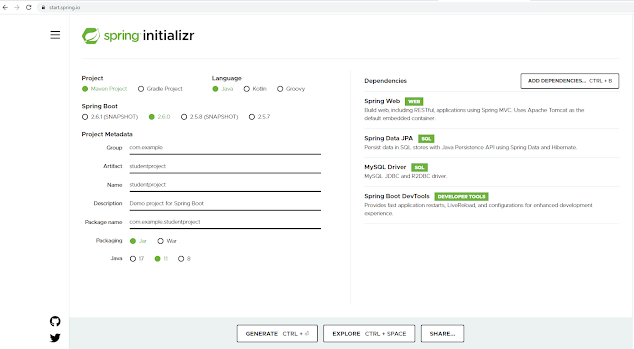
1. Create the Project
 |
Once all the details are entered, click to GENERATE to create and download your customized initial project. Spring Initializer will generate the project with the details you have entered and download a zip file with all the project folders.
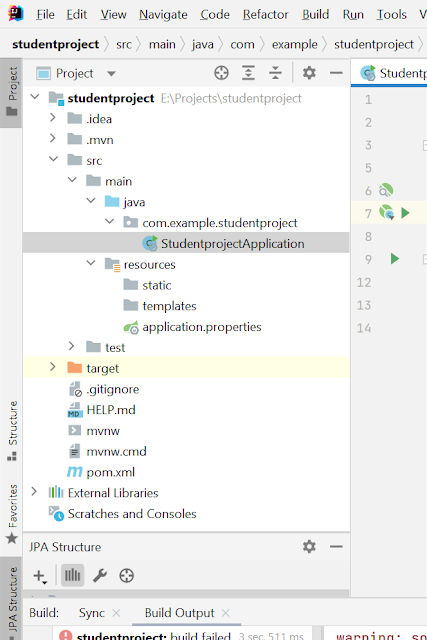
The below picture is showing the structure of the project.
2. The main entry point of the application.
package com.example.studentproject;

import org.springframework.boot.SpringApplication;
import org.springframework.boot.autoconfigure.SpringBootApplication;

@SpringBootApplication
public class StudentprojectApplication {

   public static void main(String[] args) {
      SpringApplication.run(StudentprojectApplication.class, args);
   }

}
3. Resources folder
server.port=8080

spring.jpa.hibernate.ddl-auto=update
spring.datasource.url=jdbc:mysql://localhost/starbucks?createDatabaseIfNotExist=true
spring.datasource.username=root
spring.datasource.password=
spring.jpa.database-platform=org.hibernate.dialect.MySQL5InnoDBDialect
5. Code Domain Model Class
import com.student.crudapp.repository.StudentRepository;
import org.springframework.beans.factory.annotation.Autowired;

import javax.persistence.*;

@Entity
public class Student {

    @Id
    @GeneratedValue(strategy=GenerationType.AUTO)
    private int id;

    private String name;

    private String email;

    private String grade;

    public int getId() {
        return id;
    }

    public void setId(int id) {
        this.id = id;
    }

    public String getName() {
        return name;
    }

    public void setName(String name) {
        this.name = name;
    }

    public String getEmail() {
        return email;
    }

    public void setEmail(String email) {
        this.email = email;
    }

    public String getGrade() {
        return grade;
    }

    public void setGrade(String grade) {
        this.grade = grade;
    }

    @Override
    public String toString() {
        return "Student{" +
                "id=" + id +
                ", name='" + name + '\'' +
                ", email='" + email + '\'' +
                ", grade='" + grade + '\'' +
                '}';
    }
}
6. Code Repository Class
import com.student.crudapp.model.Student;
import org.springframework.data.jpa.repository.JpaRepository;
import java.util.List;

public interface StudentRepository extends JpaRepository<Student, Integer> {
    List<Student> findAll();
    Student findById(int id);
    int deleteById(int id);

}
7, Code Service Class
package service;

import com.student.crudapp.model.Student;
import com.student.crudapp.repository.StudentRepository;
import org.springframework.beans.factory.annotation.Autowired;
import org.springframework.stereotype.Service;

import javax.transaction.Transactional;
import java.util.ArrayList;
import java.util.List;

@Service
@Transactional
public class StudentService {

    @Autowired
    StudentRepository studentRepository;

    //Get all the students
    public List<Student> getAllStudents() {
        List<Student> students = studentRepository.findAll();
        return students;
    }

    //display one student by id
    public Student getStudentById(int id) {
        return studentRepository.findById(id);
    }

    //save student in database
    public void saveStudent(Student student) {
        try{
            studentRepository.save(student);
        }
        catch(Exception e){
            e.printStackTrace();
        }
    }

    //delete stuednt by id
    public void deleteStudent(int id) {
        try{
            studentRepository.deleteById(id);
        }catch(Exception e){
            e.printStackTrace();
        }
    }

}
8. Code REST Controller Class
package com.student.crudapp.controller;

import com.student.crudapp.model.Student;
import com.student.crudapp.repository.StudentRepository;
import org.springframework.beans.factory.annotation.Autowired;
import org.springframework.stereotype.Controller;
import org.springframework.web.bind.annotation.*;

import java.util.List;

@Controller
public class StudentController {

    @Autowired
    StudentRepository studentRepository;

    //check the api's working correctly api
    @RequestMapping(value="/ping", method=RequestMethod.GET)
    @ResponseBody
    public String healthCheck() {
        return "This is working well";
    }


    @RequestMapping(value="/students", method=RequestMethod.GET)
    @ResponseBody
    public List<Student> getAllStudents() {
        return studentRepository.findAll();
    }

    @RequestMapping(value="/student", method=RequestMethod.POST)
    @ResponseBody
    public Student addStudent(Student student) {
        return studentRepository.save(student);
    }

    @RequestMapping(value="/findstudent", method = RequestMethod.GET)
    @ResponseBody
    public Student findStudent(@RequestParam("studentId") int studentId) {
        return studentRepository.findById(studentId);
    }

    @RequestMapping(value= "/updatestudent", method = RequestMethod.GET)
    @ResponseBody
    public Student updateStudent(@RequestBody Student student){
        return studentRepository.save(student);
    }

    @RequestMapping(value="/deletestudent", method = RequestMethod.GET)
    @ResponseBody
    public int deleteStudent(@RequestParam("studentId") int studentId) {
        return studentRepository.deleteById(studentId);
    }
}
9. Code Spring Boot Application Class
package com.student.crudapp;

import org.springframework.boot.SpringApplication;
import org.springframework.boot.autoconfigure.SpringBootApplication;

@SpringBootApplication
public class CrudappApplication {

   public static void main(String[] args) {
      SpringApplication.run(CrudappApplication.class, args);
   }

}
This class will start embedded Tomcat server hosting our Spring Boot web application.
The project will run on port 8080 and url http://localhost:8080/

10. Test the API and Project
Finally, we will examine the APIs in this project and demonstrate how to test them using the popular tool, Postman.
This will allow you to validate and interact with the created APIs effectively..
1. Add a student (POST Request)
http://localhost:8080/student
{ "name": "test", "email": "test@gmail.com", "grade": "05" }
2. Get all students (GET Request)
http://localhost:8080/students
3. Find a student (GET Request)
Spring Boot + MySQL Database example (CRUD) in Java
 How we spend our days is, of course, how we spend our lives.
May 24, 2023
Comments

This tutorial is a fantastic resource for anyone looking to learn and master Spring Boot for building RESTful APIs.


